Скачать с ютуб Sewing Vlog: Liberty Heirloom Tote в хорошем качестве
Sewing Vlog: Liberty Heirloom Tote
1 год назад
Скачать бесплатно и смотреть ютуб-видео без блокировок Sewing Vlog: Liberty Heirloom Tote в качестве 4к (2к / 1080p)
У нас вы можете посмотреть бесплатно Sewing Vlog: Liberty Heirloom Tote или скачать в максимальном доступном качестве, которое было загружено на ютуб. Для скачивания выберите вариант из формы ниже:
Загрузить музыку / рингтон Sewing Vlog: Liberty Heirloom Tote в формате MP3:
Если кнопки скачивания не
загрузились
НАЖМИТЕ ЗДЕСЬ или обновите страницу
Если возникают проблемы со скачиванием, пожалуйста напишите в поддержку по адресу внизу
страницы.
Спасибо за использование сервиса savevideohd.ru
Sewing Vlog: Liberty Heirloom Tote
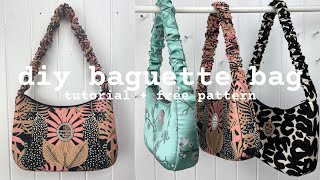
I'm on a bag-making hype so I couldn't resist self-drafting another tote bag pattern. This design is EVEN easier than the last, as it doesn't involve any patch working and is the perfect scrap buster as it's made completely from fat quarters! I chose to use the brand new Liberty Heirloom Collection for my bag which I'm completely in love with. I'll be uploading some Heirloom bag kits to my Etsy shop at 5:30pm this Sunday, so make sure to snap one up if you want to be bag twins! (Shop here from Sunday: https://www.etsy.com/uk/shop/TheCraft...) Things you'll need: 4x fat quarters of complimenting fabric Wadding To cut out: (W x H) 2x main bag pieces- 25 x 29 cm 2x lining pieces- 25 x 29 cm 2x wadding pieces- 25 x 29cm 2x outer pockets- 18 x 17 cm 4x strap pieces (2 pieces will make one strap)- 9 x 56cm 4x ruffle strips- 9 x 56cm * Optional inner lining pocket- 22.5 x 16cm Instructions: 1. Baste wadding to main bag pieces and trim any excess 2. Prepare outer pockets. Press top edge under 0.5cm and then another 1cm and stitch down. Pin in position on front and back of bag. 3. Sew two bag straps together along short edge. Press. Fold in half lengthways and stitch to form a tube. Turn out and press. Repeat for other handle. Edgestitch along each of the long sides 2mm from edge. 4. Pin handles to main bag matching raw edges and making sure the raw edges of the pocket are enclosed. Now is a good time to add a label if you're using one. Stitch down following the edgestitching line, stopping 1cm away from the top edge. 5. Sew all frill pieces together along short edges. Sew a seam at both short ends and turn out. Press lengthways with wrong sides together. Run two rows of gathering stitches along the frill. Gather to be the same length as the bag, pin & stitch in place. 6. Add pocket to lining if desired. 7. Pin both main bag pieces together all the way round the outside and stitch in place. Repeat for lining leaving a least a 1 inch gap the bottom to allow us to turn the bag right side out. 8. Turn main bag piece to be right side out. Place main bag inside the lining with right sides together and pin all the way round the top, making sure the handles are not trapped. Stitch around top. 9. Using the hole in the lining, pull the main bag through to turn the whole bag out. Stitch up hole in the lining and edgestitch round top rim of the bag if desired. 10. Press, trim threads, and enjoy your new make! If you do decide to make your own, make sure to tag @the_crafty_pie on Instagram so I can see them all!!
Comments