Скачать с ютуб Sewing Machine Tension Issues - Thread Looping Underneath - Part 2 в хорошем качестве
Sewing Machine Tension Issues - Thread Looping Underneath - Part 2
3 года назад
Скачать бесплатно и смотреть ютуб-видео без блокировок Sewing Machine Tension Issues - Thread Looping Underneath - Part 2 в качестве 4к (2к / 1080p)
У нас вы можете посмотреть бесплатно Sewing Machine Tension Issues - Thread Looping Underneath - Part 2 или скачать в максимальном доступном качестве, которое было загружено на ютуб. Для скачивания выберите вариант из формы ниже:
Загрузить музыку / рингтон Sewing Machine Tension Issues - Thread Looping Underneath - Part 2 в формате MP3:
Если кнопки скачивания не
загрузились
НАЖМИТЕ ЗДЕСЬ или обновите страницу
Если возникают проблемы со скачиванием, пожалуйста напишите в поддержку по адресу внизу
страницы.
Спасибо за использование сервиса savevideohd.ru
Sewing Machine Tension Issues - Thread Looping Underneath - Part 2
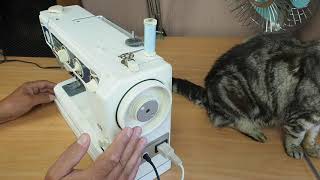
This little Elna Lotus TSP came in with a tension problem. Find Part 1 here - • Sewing Machine Tension Issues - Threa... This tension issue can affect any type of sewing machine. It can seem strange that the problem on the bottom is caused by top thread tension but it is nearly always the case. Generally it is an indication that the top thread is too loose. This video shows that even though the top tension is set in the normal zone, there can be an issue with the tension being too loose.There are several causes of this problem but in this case it is caused by rusty tension disks. It looks like the machine has been sitting and some moisture has soaked into the thread and caused corrosion on the disks. The way a tension assembly works is to provide consistent thread tension by clamping the thread between metal disks. Contaminants such as lint, dust or general grime in between the disks can cause them to be held open, therefore the thread is no longer being clamped properly by the disks. This can cause loose or inconsistent tension. Another thing to check is that the tension release mechanism is functioning correctly. When working correctly, the mechanism should only release the thread tension when the presser foot is lifted, therefore allowing the thread to be pulled freely through the tension disks and allowing the fabric to be easily removed from the machine. If incorrectly set, the release mechanism can be holding the disks open slightly or it may not open the disks when the presser foot is lifted. I show how to carry out a quick clean and if that doesn't help the top cover on the Elna Lotus is removed to gain access to the set screw that holds the tension assembly in the machine frame. Once the set screw is loosened, the whole tension assembly can be removed. I show how to disassemble the tension assembly so the disks can be checked and cleaned if necessary. An oil stone is used to clean up the disks and then the tensioner is assembled and installed. The top tension is provisionally set and then the can be fine tuned. Once the top tension is set correctly, the knob can be installed in the mid position (5). Index: 0:00 - Introduction 0:53 - Checking tensions by feel 2:55 - Looking at the tension assembly 3:43 - Tension release 4:03 - Trying the quick fix 5:37 - Removing the tension assembly from the machine 9:03 - A close look at the tension assembly 11:29 - Partially disassembling the tension assembly 13:14 - A close look at the tension disks 13:39 - Time to crack out the oil stone 16:47 - Inspecting the repaired disks 17:16 - Assembling the tension assembly 18:13 - Installing the tension assembly 20:52 - Provisional tension adjustment 21:47 - Sew testing and tension fine tuning 23:26 - Installing the tension knob 23:40 - Conclusion www.institches.co.nz www.patreon.com/sewingmachines
Comments