Скачать с ютуб How To Assemble the Walking Bob Escapement в хорошем качестве
How To Assemble the Walking Bob Escapement
1 год назад
Скачать бесплатно и смотреть ютуб-видео без блокировок How To Assemble the Walking Bob Escapement в качестве 4к (2к / 1080p)
У нас вы можете посмотреть бесплатно How To Assemble the Walking Bob Escapement или скачать в максимальном доступном качестве, которое было загружено на ютуб. Для скачивания выберите вариант из формы ниже:
Загрузить музыку / рингтон How To Assemble the Walking Bob Escapement в формате MP3:
Если кнопки скачивания не
загрузились
НАЖМИТЕ ЗДЕСЬ или обновите страницу
Если возникают проблемы со скачиванием, пожалуйста напишите в поддержку по адресу внизу
страницы.
Спасибо за использование сервиса savevideohd.ru
How To Assemble the Walking Bob Escapement
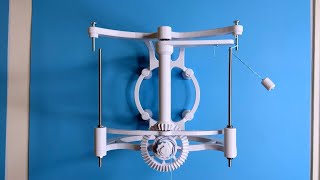
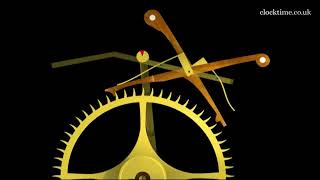
This is the escapement powered by Bob, the humble escapement operator. Bob is the one responsible for adding a pulse to keep the pendulum swinging, as well as triggers the advancement of the escapement wheel. This is my take on this escapement designed by dgreene909 The STL File: https://jbvcreative.com/products/the-... Prints on all standard 3d printers without supports, requires the following additional parts to assemble: - 8 M4x12 Screw (I used https://amzn.to/3Cf7dpp) - 6 M4 Washers (These are the ones https://amzn.to/3Sh129Z) - 4 624Z 13mm OD/4mm ID Bearings (These work great https://amzn.to/3rdtj58) - 1mm Nylon String or Fishing Line (I used string from this set https://amzn.to/3dOHT00) Recommended print settings: Layer Height: 0.2mm Nozzle: 0.4mm Infill: 15-18% Total Print Time: ~15.75 hours Total Filament Required: ~145g Minimum Build Plate Required: 200x200mm Please note that these files are for personal enjoyment only. If you do wish to sell PRINTED versions of this model, you can do so with a JBV Creative Small Business License / jbvcreative **All the files have been pre-oriented to save you some set up time! All you need to do is drop the parts into your slicer and hit print! The Kit: Let me do the printing for you! You will receive all the parts required to assemble this kinetic sculpture yourself. Discord Channel: I Created a discord channel to talk about all things Escapement and 3D Printed clock. You can join with / discord
Comments