Скачать с ютуб Farmhouse Coffee Table Build (free plans in description) в хорошем качестве
Farmhouse Coffee Table Build (free plans in description)
4 года назад
Скачать бесплатно и смотреть ютуб-видео без блокировок Farmhouse Coffee Table Build (free plans in description) в качестве 4к (2к / 1080p)
У нас вы можете посмотреть бесплатно Farmhouse Coffee Table Build (free plans in description) или скачать в максимальном доступном качестве, которое было загружено на ютуб. Для скачивания выберите вариант из формы ниже:
Загрузить музыку / рингтон Farmhouse Coffee Table Build (free plans in description) в формате MP3:
Если кнопки скачивания не
загрузились
НАЖМИТЕ ЗДЕСЬ или обновите страницу
Если возникают проблемы со скачиванием, пожалуйста напишите в поддержку по адресу внизу
страницы.
Спасибо за использование сервиса savevideohd.ru
Farmhouse Coffee Table Build (free plans in description)
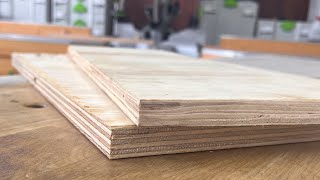
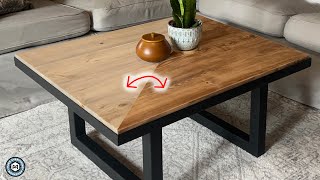
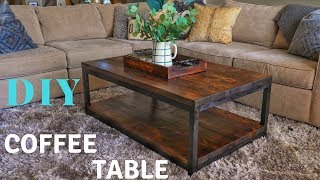
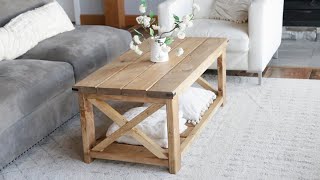
Tools used in this video Speed square: https://amzn.to/3oJryJj K4 Kreg Jig: https://amzn.to/3oq5fbt Irwin 48” clamps: https://amzn.to/2Yodiem HomeRight Paint Sprayer: https://amzn.to/2Mw81ii Dewalt random orbital sander: https://amzn.to/3osPxwr Jorgensen clamps: https://amzn.to/3j3FEnO Here's a video of my most recent farmhouse coffee table build! The table is 48" x 28" x 18" (dimensions are approximate within 1/2" or so). The top is finished with Minwax Special Walnut, and the bottom is painted with Valspar Express Pro extra white. This table is built completely from pine, except the legs which are Douglas fir. I planed and ripped everything before starting so my stock would be square. The top is 4 boards - I took two 2x8x8' boards, cut them in half (to get 4 2'x4'x8" boards. I ripped them all for a straight edge and then planed them to about 1.125" thick. I put the boards together using pocket holes made with a Kreg jig K4. The bottom shelf is made similar, but with 3/4" pine appearance board. I used left over scrap board that I already had, so I don't have exact dimensions - you could use any type of material or even plywood for this. I made this about 1/2" shorter on all sides that the top board to allow for the top piece to have an overhang. The legs are made from 4x4 Douglar fir - each is 16.5" tall. After I have the legs cut I mark them flush with the bottom shelf, and cut out slots for the legs. Next, I cut the length and width support frames. *IMPORTANT* - these need to be the exact same length as the bottom shelf (after the notches for the legs are cut out). I don't measure these with a tape measure, but rather use the bottom shelf to mark, and then cut exactly the same measurement (I have 4 length supports (2 top, 2 bottom), and 4 width supports (2 top, 2 bottom). (For reference the length supports are about 39" long and the width supports are about 19.5" long (they're made from 2x4 boards)). After having the frame cut out, I attached the bottom frame pieces to the underside (where the pocket holes are) of the bottom shelf. I used wood glue and construction screws for this. (I used 2 width supports and 2 length supports here). Be sure to get the boards flush with the shelf if you're able to do so. Next, I attached the top supports to the legs using glue and pocket hole screws. When I have this frame piece assembled, I attached it to the bottom shelf using pocket hole screws. After the width frame pieces are attached, I can install the length supports. It's much easier to do with the table standing on one end, so the supports won't fall. I clamped them into place and used pocket hole screws to keep them in place. After the frame is together, I added in the x's - which I ripped from some scrap stock. I overlapped the X pieces and marked the outline with a pen, then cut the angles with my miter saw. I cut a half-lap joint in the middle so the X pieces would fit flush together. These are wedged into place, and then attached through the top and bottom with screws. Finally, after painting (valspar express extra white) and staining (minwax special walnut), I attached the top (I routered the top using a 1/4 roundover bit) using construction screws. I usually use table top buttons or table top fastners to allow for wood movement, but did not with this project. Thanks for watching/reading, and be sure to subscribe for more! - Matt *DISCLAIMER* The following content is for entertainment purposes only. Woodworking and using power tools can be extremely dangerous if not done properly. YOU (the viewer) are fully responsible for understanding proper use of tools, as well as the safety features of each. I highly suggest reading the owners manual and/or watching how-to videos on the tools. I (MMCC_Woodshop) am not responsible nor liable for any injury, death, or handing of the tools you may use, nor do I assume to display the proper handing of as a demonstration. Please use extreme caution when working with any power tools. - Matt Want to support my channel? Feel free to buy me a coffee!https://www.buymeacoffee.com/mmccwoodsh7
Comments