Скачать с ютуб Budget DIY Floppy Flag & Scrim for $60 | Negative Fill for Cinematic Lighting в хорошем качестве
Budget DIY Floppy Flag & Scrim for $60 | Negative Fill for Cinematic Lighting
1 месяц назад
floppy
floppy flag
scrim
cutter
floppies
flag
cut light
shape light
block light
negative fill
lighting
cinematic lighting
cinematic look
video lighting
interview lighting
hollywood lighting
cinema lighting
cinematography
cinematography lighting
film
filmmaking
filmmaker
budget lighting
videography
filmmaking tips
filmmaking techniques
filmmaking tutorial
lighting tutorial
film production
film lighting
negative fill material
diy
lighting tips
grip
moody
Скачать бесплатно и смотреть ютуб-видео без блокировок Budget DIY Floppy Flag & Scrim for $60 | Negative Fill for Cinematic Lighting в качестве 4к (2к / 1080p)
У нас вы можете посмотреть бесплатно Budget DIY Floppy Flag & Scrim for $60 | Negative Fill for Cinematic Lighting или скачать в максимальном доступном качестве, которое было загружено на ютуб. Для скачивания выберите вариант из формы ниже:
Загрузить музыку / рингтон Budget DIY Floppy Flag & Scrim for $60 | Negative Fill for Cinematic Lighting в формате MP3:
Если кнопки скачивания не
загрузились
НАЖМИТЕ ЗДЕСЬ или обновите страницу
Если возникают проблемы со скачиванием, пожалуйста напишите в поддержку по адресу внизу
страницы.
Спасибо за использование сервиса savevideohd.ru
Budget DIY Floppy Flag & Scrim for $60 | Negative Fill for Cinematic Lighting
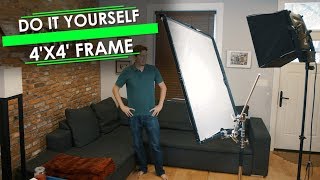
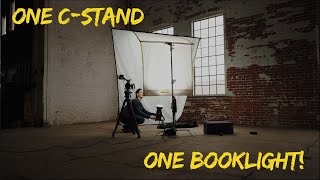
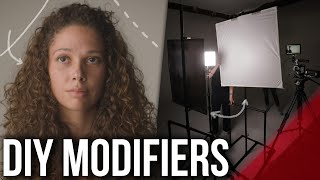
In this video, I show how to create a budget DIY Floppy Flag & Scrim for $60 AUD. A floppy can be an essential tool for cutting and shaping light on set. Though professional floppies can cost upwards of $400, which is a steep price for those of us just starting out or looking to experiment with new techniques. Join me as I delve into the process of selecting the right materials & parts to assembling the frame and adding the fabric. Alongside the final results, I share the challenges & lessons learned to help and inspire you to build your own budget light-shaping tool. Whether you're looking to add contrast to your subject with negative fill or block surrounding unwanted light from your shot, this DIY floppy is a great starting point for filmmakers on a budget. If you find this video helpful or have any questions, I’d love to hear from you in the comments. Parts that I used and where I bought them from: • 4x 16mm Metal Curtain Rods (Highly recommended to find a smaller rod diameter instead) - Link: https://www.curtainwonderland.com.au/... Store & Price Paid: Curtain Wonderland | $15.80 AUD • 4x Camera Flash Brackets - Link: https://www.temu.com/goods.html?_bg_f... Store & Price Paid: Temu | $25.84 AUD • 1x Black Velvet Cloth - Link: https://www.aliexpress.com/item/10050... Store & Price Paid: AliExpress | $19.48 AUD Total Price Paid: $61.12 AUD You can also find me here: Instagram: / alejandrourman_ TikTok: / alejandro.urman Portfolio: https://alejandrourman.com Timestamps: 00:00 - Introduction 00:14 - What is a Floppy? 00:25 - Negative Fill & Blocking Light 00:42 - Expensive Professional Options 01:09 - Parts That I Used 01:14 - Finding the Right Frame Size 01:30 - Finding Budget Frames 01:46 - Various DIY Approaches 02:03 - PVC Option I Considered 02:16 - Curtain Rod Idea 02:25 - Sourcing Curtain Rods & Plastic Elbow Joints 02:38 - Testing Curtain Rods & Plastic Elbow Joints 02:49 - New Elbow Joint Idea 03:03 - Testing New Elbow Joint Idea 03:18 - Neewer Clips as Elbow Joints 03:32 - Temu Flash Bracket Mount as Elbow Joints 04:01 - Smaller Diameter Rod Recommendation 04:11 - Cons of Temu Flash Bracket Mount 04:22 - Black Velvet Fabric Sizing 04:34 - AliExpress Black Velvet Fabric 04:47 - Using the Black Velvet Fabric 05:00 - Final Result & Clamps/Clips Holding Frame 05:19 - Visual Before & After 05:37 - Final Recommendations 05:59 - Outro Equipment used: Camera - • Sony A7IV (Filmed in SLog3/S-Gamut3.cine) Lenses - • Sony FE 24mm f/1.4 G Master Lens • Sony FE Zeiss 35mm f/1.4 Lens Tripods - • Fotopro X-Aircross 3 Lighting - • Godox VL150 Video LED Light • Godox Octa 95cm Softbox Audio - • Rode M5 Compact Condenser Microphone • Rode AI-1 Audio Interface Field Monitor - • Desview R6 UHB 5.5” Monitor Teleprompter - • Glide Gear TMP100 Editing - • DaVinci Resolve
Comments