Скачать с ютуб HOW TO REPLACE RV AC DOMETIC PENGUIN II DUO THERM HEAT PUMP - 12 button to 5 button Conversion kit в хорошем качестве
HOW TO REPLACE RV AC DOMETIC PENGUIN II DUO THERM HEAT PUMP - 12 button to 5 button Conversion kit
6 лет назад
Скачать бесплатно и смотреть ютуб-видео без блокировок HOW TO REPLACE RV AC DOMETIC PENGUIN II DUO THERM HEAT PUMP - 12 button to 5 button Conversion kit в качестве 4к (2к / 1080p)
У нас вы можете посмотреть бесплатно HOW TO REPLACE RV AC DOMETIC PENGUIN II DUO THERM HEAT PUMP - 12 button to 5 button Conversion kit или скачать в максимальном доступном качестве, которое было загружено на ютуб. Для скачивания выберите вариант из формы ниже:
Загрузить музыку / рингтон HOW TO REPLACE RV AC DOMETIC PENGUIN II DUO THERM HEAT PUMP - 12 button to 5 button Conversion kit в формате MP3:
Если кнопки скачивания не
загрузились
НАЖМИТЕ ЗДЕСЬ или обновите страницу
Если возникают проблемы со скачиванием, пожалуйста напишите в поддержку по адресу внизу
страницы.
Спасибо за использование сервиса savevideohd.ru
HOW TO REPLACE RV AC DOMETIC PENGUIN II DUO THERM HEAT PUMP - 12 button to 5 button Conversion kit
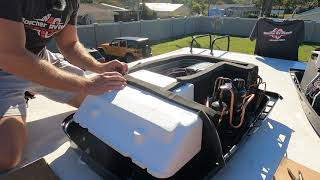
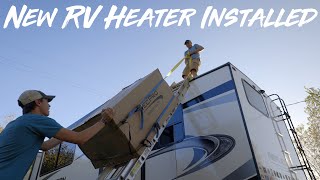
🛠️🧰👨🔧🔩⚡ TOOLS, PARTS USED IN THIS PROJECT: 👨🏭⚙️🔧🧰🔨🔦 Amazon Link DOMETIC AIR CONDITIONERS 640310CXX1J0 Standard Dometic Penguin II Low-Profile: https://amzn.to/3eFW9pd DOMETIC Air Conditioners 651816CXX1J0 Penguin II Air Heat Pump 15: https://amzn.to/3kRbaXc Amazon link for conversion kit: https://amzn.to/2EgmNTU Communication Cable Dometic 3106614.013 18': https://amzn.to/3dkszmW Dometic 3314082.000 3312024.000 Duo Therm Comfort Control 2 CCC2: https://amzn.to/34Q6JnB “As an Amazon Associate I earn from qualifying purchases at no cost to you.” This How to Replace an old (rear) RV roof AC unit on an RV is a great upgrade. The new AC is a Dometic (651815) Penguin II - 13500 BTU - Low Profile - Duo Therm - Heat Pump I also had to purchase a heat pump conversion kit that consists of a pigtail wire and confort control board ( Part number 3313107107) what this board does, it makes my old style 5 button comfort control work with this unit. this new ac unit comes with a board that works with the new 12 button controller. I am not an electrician and as you will see I have an AC technician/friend doing those particular hookups and adjustments. Before we start working I shut off the circuit breaker for the 120 Volt AC and disconnect main switch for the 12 Volt DC system. This unit weighs approximately 100 pounds. they advise to use a mechanical hoist to place the unit on the roof. To prevent back injury. We hoisted the unit to the roof (still in the box) with straps around 4 sides of the box and a rope, while using a ladder to guide it and 3 people. I did not video this part. all i can advice is to have enough people helping. 1. uninstall the old unit. I Cleaned the area around the opening with some spray detergent. 2. Following the provided instructions, Ricky is exchanging the board, which is the conversion kid I mentioned earlier Which is compatible with my 5-button control .3. Lift and place the unit over the opening using the gasket on the unit as a guide. CAUTION: Do not slide the unit at any time. This may damage the neoprene gasket attached to the bottom and may leak in the RV later. 4. once it's approximately aligned, one person staying on the roof and 1 person inside the RV, we finish aligning while the person in the rv installs the return air cover kit inserting the 4 long bolts between the inside plate and the bottom of the ac unit. Unit may be moved from below by slightly lifting. Be sure the large plate faces the rear of the RV when bolting the unit. Start each mounting bolt through the ceiling template and up into the unit base pan by hand. After they are hand tight, Install wood screw in each end of the ceiling template. This insures a tight fit of the return air cover to ceiling. Then, he Tighten the bolts To Compress Gasket To 1/2". Evenly tighten the bolts to a torque of 40-to-50-inch pounds. This will compress the roof gasket to approximately 1/2". The bolts are self-locking, so further tightening is not necessary. CAUTION: If bolts are left loose there may not be adequate roof seal or if over tightened, damage may occur to the unit base or ceiling template. We reuse the old Divider Plate (foam) to cover the ceiling to roof thickness: We put duct tape all around and on top of the foam plate to Insure a nice seal. CAUTION: Improper installation and sealing of divider plate will cause the compressor to quick cycle on the cold control. This may result in fuse or circuit breaker opening and/or lack of cooling. This is to help prevent cold air discharge from circulating into the unit return air opening. Plug in all the ac and dc wires and splice and connect as needed. Reinstall filter cover inside the RV roof. MUSIC: Call to Adventure - Comedy by Kevin MacLeod is licensed under a Creative Commons Attribution license (https://creativecommons.org/licenses/...) Source: http://incompetech.com/music/royalty-... Artist: http://incompetech.com/ My Motorhome is a 2003 National Dolphin LX model 6320. W 22, Workhorse Chassis 8.1 Vortex Engine 340 HP Allison Transmission 1000 Series, 5 speed automatic overdrive. Tires: Goodyear 245/75R22.5 134/132L G G661 HSA. EEZRV TPMS. Onan Generator: Marquis Platinum 5500 Fuel Injection. Lights: LED Bulb 102-3528SMD DC 12V Cool White. DOMETIC Refrigerator NEW DIMENSIONS MODEL NDR 1062. Suspension: KONI shocks. BLUE OX AVENTA II BX7335 TOW BAR 10,000 POUND CLASS IV RV TOWBAR Toed brake assist: Brake Buddy. Toad vehicle: 2007 Hummer H3 (see Playlist) • HOW TO REPLACE DOOR LOCK ACTUATOR and... AIR CONDITIONS - Dometic (651815) Penguin II - 13500 BTU - Low Profile - Duo Therm - Heat Pump. I also had to purchase a Heat pump Conversion Kit that consists of a pigtail wire and confort control board ( Part number 3313107107). It makes my old style 5 button confort control work with this units Heat Pump. The new ac units come with a board that workes with the new 12 button controller only
Comments