Скачать с ютуб Motorcycle Transmission Rebuild Yamaha TTR225 в хорошем качестве
Motorcycle Transmission Rebuild Yamaha TTR225
7 лет назад
Скачать бесплатно и смотреть ютуб-видео без блокировок Motorcycle Transmission Rebuild Yamaha TTR225 в качестве 4к (2к / 1080p)
У нас вы можете посмотреть бесплатно Motorcycle Transmission Rebuild Yamaha TTR225 или скачать в максимальном доступном качестве, которое было загружено на ютуб. Для скачивания выберите вариант из формы ниже:
Загрузить музыку / рингтон Motorcycle Transmission Rebuild Yamaha TTR225 в формате MP3:
Если кнопки скачивания не
загрузились
НАЖМИТЕ ЗДЕСЬ или обновите страницу
Если возникают проблемы со скачиванием, пожалуйста напишите в поддержку по адресу внизу
страницы.
Спасибо за использование сервиса savevideohd.ru
Motorcycle Transmission Rebuild Yamaha TTR225
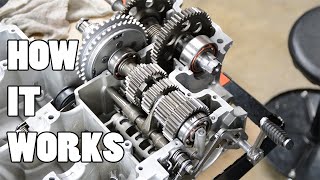
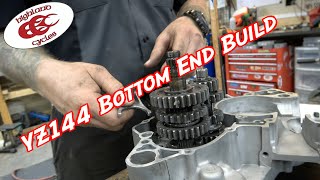
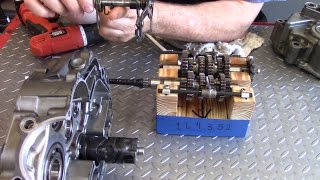
http://www.rrrtoolsolutions.com/artic... We rebuild the motorcycle transmission for the Yamaha TTR225. We take you through the whole process. Installing the crank shaft, Counter-balancer, and transmission assembly with the shifting forks. We show you how to install the shifting forks and test the motorcycle transmission to make sure all the gears work. Applying the lower case sealant with finger tip. Adding screws and torque down to 70 inch-pounds. TRANSCRIPT: Hi Gordon “The Tool Guy” here. Today we're going to start putting back the We're going to put together the Yamaha TTR225. We're going to put the lower case together. What you don't see is about 2 and ½ hours of clean up. Now, again we've clean our cases, cleaned all the offish, we've cleaned all the threaded holes, we've cleaned all the oil passages out. What we're going to do first thing this morning, is go in and change out two seals. This is for the chain, the transmission shaft, that will drive our chain. This one is for our shift shaft. We're going to move both of these with a seal remover. We continue clean up and get ready for our new seals. We're using a driver to install our new seals. We install the crankshaft. We install the counter-balancer. We install the assembled transmission. The shift forks must be installed at the same time. Every thing goes into place for the transmission. Turning the engine around for the camera we'll show you how the shift-forks engage with the drum. These groves in the shift-drum control the movement and position of all three shift-forks. The position of these in turn control which of the six speeds or neutral is selected. The forks are now fully installed. A few turns prove and conform that we have the forks and the drum properly installed. And assembled. All six gears are tested. Now, to clean for the final time, before we apply case sealant. We're use bake cleaner and a towel to remove all oil and residue My favorite method is to apply the case sealant with my finger tips. I apply a light even coat on the sealing surfaces. The sealant is on one side. We let the case sealant tack for about 10 to 15 minutes. Just until it is slightly sticky. We install our dow-pins We add a little grease to the end of the transmission shaft to protect our new seal. We add a little grease to the inside of the seals themselves to protect from cutting and tearing when we slide the seals over our case assembly We place our case half on the waiting assembled right hand case It's a perfect marriage. Our cases fit together like a glove and are now ready for the screws. We add our case screws. We start adding even torque to the case screws. We're then going to tighten each screw to a final torque of 70 inch pounds after we've gone around several times.
Comments