Скачать с ютуб Cambiar cadena de distribución - Opel Corsa 1.3 CDTI в хорошем качестве
Cambiar cadena de distribución - Opel Corsa 1.3 CDTI
5 месяцев назад
Скачать бесплатно и смотреть ютуб-видео без блокировок Cambiar cadena de distribución - Opel Corsa 1.3 CDTI в качестве 4к (2к / 1080p)
У нас вы можете посмотреть бесплатно Cambiar cadena de distribución - Opel Corsa 1.3 CDTI или скачать в максимальном доступном качестве, которое было загружено на ютуб. Для скачивания выберите вариант из формы ниже:
Загрузить музыку / рингтон Cambiar cadena de distribución - Opel Corsa 1.3 CDTI в формате MP3:
Если кнопки скачивания не
загрузились
НАЖМИТЕ ЗДЕСЬ или обновите страницу
Если возникают проблемы со скачиванием, пожалуйста напишите в поддержку по адресу внизу
страницы.
Спасибо за использование сервиса savevideohd.ru
Cambiar cadena de distribución - Opel Corsa 1.3 CDTI
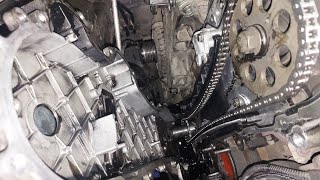
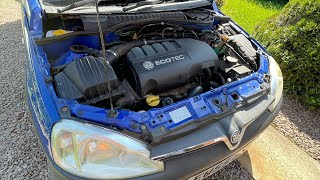
Cambiar cadena de distribución - Opel Corsa 1.3 CDTI Motor: Engine Type/No A13DTE / 4428379 ECOtec ECOflex 1.3 CDTI Cuarta generación (2006, 2007, 2008, 2009, 2010, 2011, 2012, 2013, 2014) Marca: Opel Modelo: Corsa Combustible: Diesel Cilindrada: 1248 cc Potencia: 95 CV (70 kW) Retirar la rueda derecha para acceder fácilmente a la zona inferior donde está el cárter del aceite, correa de accesorios, tubo de escape, junta de unión entre la caja de cambios y bloque de motor (00:00:35). Retirar las carcasas y canalizaciones de la entrada de aire (00:01:57). Terminamos de retirar las protecciones de plástico del de lado derecho (00:03:22). Desencajar las gomas que soportan el tubo de escape, esto es necesario para poder retirar el cárter del aceite (00:04:05). Retirar los protectores de calor que rodean al catalizador (00:06:05). El calado del motor es muy importante para un funcionamiento correcto del mismo una vez cambiada la cadena. Como se puede ver en el video, con la ayuda de una carraca y vaso adecuados se va haciendo girar el motor y con la otra mano y una llave Allen introducida por el aguajero indicado, se espera mientras se sigue girando, hasta encontrar en otro agujero más profundo que hace que se quede cataldo en una ubicación fija (00:07:43). Retiramos en catalizador para posteriormente poder retirar el cárter del aceite (00:09:41). Retiramos la junta de refuerzo entre la caja de cambios y el bloque de motor (00:10:56). Una vez retirada la pieza que refuerza la unión entre la caja de cambios y el bloque de motor, podemos proceder a retirar el cárter del aceite, es cual, además de tener muchos tornillos, está pegado con silicona (00:12:31). Habiendo asegura el motor por la parte de abajo, retiramos el soporte derecho del motor (00:14:02). Con el soporte del motor fuera, podemos retirar la correa auxiliar o de accesorios (00:15:27). Como también vamos a cambiar la bomba de agua, es necesario vaciar el radiador y todo el refrigerante (00:17:02). Para asegurarse que el calado superior se mantiene en su ubicación, con la ayuda de una llave vaso, me aseguro que todo está según lo previsto (00:18:27). Es muy importante tener claro, que esta pieza, esta polea que lleva 4 tornillos en la que en definitiva mantiene la sincronización entre el cigüeñal y el movimiento superior de válvulas. Por lo tanto, si no hemos marcado o asegurado posiciones, es en este momento, cuando aflojamos esta pieza, que todo se puede alterar (00:19:39). Retiramos la carcasa de la cadena de distribución (00:21:43). Gracias a que he marcado las posiciones, ahora puedo resincronizar fácilmente. Porque durante el desmontaje es normal que se haya movido (00:22:16). Nunca está mal tener varios puntos de referencia, por eso realizo varias marcas adicionales (00:24:00). Cambio todas o casi todas las piezas del kit de la cadena de distribución (00:26:47). Es importante limpiar correctamente las superficies para evitar fugas o perdidas de aceite o refrigerante (si se trata de la bomba de agua) (00:31:38). A partir de este momento se realiza el montaje final y se comprueba varias veces, antes del apriete de los tornillos, que el calado sigue en su posición, que no se ha movido, mirando las marcas en la cadena. English: Remove the right wheel to easily access the lower area where the oil pan, accessory belt, exhaust pipe, and joint between the gearbox and engine block are located (00:00:35). Remove the air inlet casings and ducts (00:01:57). Finish removing the plastic guards on the right side (00:03:22). Unclip the rubbers that support the exhaust pipe, this is necessary to be able to remove the oil pan (00:04:05). Remove the heat shields that surround the catalytic converter (00:06:05). Engine timing is very important for correct operation once the chain has been changed. As you can see in the video, with the help of a suitable ratchet and socket, the engine is rotated and with the other hand and an Allen key inserted through the indicated hole, we wait while continuing to rotate, until we find another deeper hole that makes the catalytic converter stay in a fixed location (00:07:43). We remove the catalytic converter to later be able to remove the oil pan (00:09:41). We remove the reinforcing gasket between the gearbox and the engine block (00:10:56). Once the piece that reinforces the joint between the gearbox and the engine block has been removed, we can proceed to remove the oil pan, which, in addition to having many screws, is glued with silicone (00:12:31). Having secured the engine from below, we remove the right engine support (00:14:02). With the engine support out, we can remove the auxiliary or accessory belt (00:15:27). Since we are also going to change the water pump, it is necessary to drain the radiator and all the coolant (00:17:02). To make sure that the upper timing remains in its position, with the help of a socket wrench, I make sure that everything is as planned (00:18:27).
Comments