Скачать с ютуб The Chevelle is getting rear disc brakes! в хорошем качестве
The Chevelle is getting rear disc brakes!
3 года назад
Скачать бесплатно и смотреть ютуб-видео без блокировок The Chevelle is getting rear disc brakes! в качестве 4к (2к / 1080p)
У нас вы можете посмотреть бесплатно The Chevelle is getting rear disc brakes! или скачать в максимальном доступном качестве, которое было загружено на ютуб. Для скачивания выберите вариант из формы ниже:
Загрузить музыку / рингтон The Chevelle is getting rear disc brakes! в формате MP3:
Если кнопки скачивания не
загрузились
НАЖМИТЕ ЗДЕСЬ или обновите страницу
Если возникают проблемы со скачиванием, пожалуйста напишите в поддержку по адресу внизу
страницы.
Спасибо за использование сервиса savevideohd.ru
The Chevelle is getting rear disc brakes!
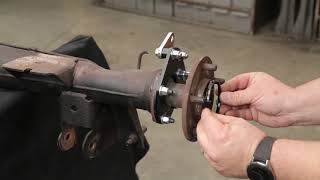
Hey, fellow car enthusiasts! Dave here from First Place Auto Parts, and today we're diving into our 1969 Chevelle project car, undergoing a frame-up restoration. In this installment, we're focusing on a rear disc brake conversion kit for cars originally equipped with drum brakes. This tutorial is applicable to any 1964-1972 Chevrolet Chevelle and Camaro featuring a 10 or 12-bolt rear end. Let's get hands-on! 🚗 *Project Overview:* Join us as we upgrade our Chevelle's braking performance with the Street Series Performance Kit from First Place Auto Parts. We're opting for drilled and slotted rotors and black powder-coated calipers to enhance both aesthetics and durability. 🔧 *Step 1: Prepping the Rear End:* After securing the vehicle on jack stands, the initial steps involve removing the rear wheels and brake drums. Subsequently, the bolts on the rear end cover are loosened, allowing us to carefully remove it. A drain pan beneath the cover catches the old gear lube. 🛠️ *Step 2: Differential Pin Removal:* Next, we tackle the center differential pin. Removing the retaining bolt and then the pin itself gives us access to the axle. By pushing on the axle flange, we reveal the C-clip, which is then extracted using a magnet. 🔩 *Step 3: Disassembly and Bracket Selection:* The axle is pulled out as a complete assembly, maintaining the brake components. We proceed by disassembling the brake hardware from the backing plate. Now, we select the appropriate bracket for the left side (driver's side), considering the caliper orientation and rotor clearance. 🔄 *Step 4: Caliper Bracket Installation:* With the bracket in place, including spacers as needed, we move on to installing the axle, rotor, and caliper. Careful alignment is crucial, ensuring the rotor sits equidistant between the inboard and outboard brake pads. We also demonstrate the use of spacers for adjustment. 🔩 *Step 5: Caliper Installation and Adjustment:* Calipers are mounted with the parking brake assembly and bleeder screws positioned at the top. Final adjustments involve checking the rotor-to-pad clearance and adding or removing spacers as necessary. 🛠️ *Step 6: Completion and Style Upgrade:* The installation is complete, providing a significant style and performance upgrade to our classic vehicle. Rear disc brakes not only enhance safety but also add a touch of modern flair. 🔗 *Stay Connected:* Follow First Place Auto Parts on Facebook and YouTube for more insightful product reviews and installation guides. Whether you're a seasoned car enthusiast or tackling DIY projects, we've got valuable content for you. 👍 *Like & Subscribe:* If you found this video helpful or simply enjoyed the content, don't forget to hit the like button and subscribe. Stay tuned for upcoming videos, including the installation of rear brake lines and brake system bleeding. Until next time, keep the hammer down and stay between the guardrails! 🏎️💨 Check out all the parts we carry for your project car at https://fpautoparts.com/ ! Get your disc brake conversion kits here! https://fpautoparts.com/disc-brake-co... Follow us on our social pages; / firstplaceautoparts / firstplaceautoparts / first-place-auto-parts / firstplace_auto
Comments