Скачать с ютуб HomeMade plywood boat part 10 - Making the tunnel and adding flotation foam в хорошем качестве
HomeMade plywood boat part 10 - Making the tunnel and adding flotation foam
7 лет назад
Скачать бесплатно и смотреть ютуб-видео без блокировок HomeMade plywood boat part 10 - Making the tunnel and adding flotation foam в качестве 4к (2к / 1080p)
У нас вы можете посмотреть бесплатно HomeMade plywood boat part 10 - Making the tunnel and adding flotation foam или скачать в максимальном доступном качестве, которое было загружено на ютуб. Для скачивания выберите вариант из формы ниже:
Загрузить музыку / рингтон HomeMade plywood boat part 10 - Making the tunnel and adding flotation foam в формате MP3:
Если кнопки скачивания не
загрузились
НАЖМИТЕ ЗДЕСЬ или обновите страницу
Если возникают проблемы со скачиванием, пожалуйста напишите в поддержку по адресу внизу
страницы.
Спасибо за использование сервиса savevideohd.ru
HomeMade plywood boat part 10 - Making the tunnel and adding flotation foam
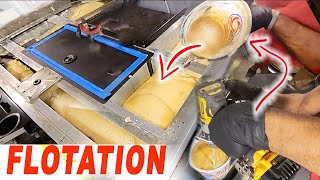
The homemade plywood Boat build continues, and part 10 is all about making the center tunnel to create an additional cavity for more foam while simultaneously providing an elevated seating platform for attaching the seats. this is particularly important as the bottom is only 1/2" thick and i do not have much to attach to. the elevated platform may end up with a few riser blocks to make the seating height a pinch more comfortable. For this boat i am using readily available materials which in this case includes insulation foam board, which was quite easy to use, cut and shape. the purpose of the foam is to fill the cavity so that water cannot fill it in the event of a catastrophic failure. in total i managed to add an estimated 4 cubic feet of foam to the boat. this will give me approximately 248 lbs of buoyancy. the boat being wood will actually give me a bit more... somewhere around 300 lbs of buoyancy. the actual weight of the boat is estimated around 100 lbs... i have no doubt that the "proper" flotation foam would have been easier to use but i am happy with the results even though they are less than perfect. the side rails for the tunnel were quite simple to cut but all of them were made to taper from one frame to the next. this means that the front most part of the tunnel rail is 3.5" tall and the rear most at the transom is only 1.75" tall. the inside of the cavities were reinforced with PL Premium (a lesson learned from closing in the bow and experimenting with the material) fillets. the Insulation board had to be chamfered to clear the fillets but that was easily done with a surform block plane. lastly the cavity was capped with the platform board... the finish is in sight! is it the MOST perfect boat, not at all, but it is MY boat! Part 1 - • HomeMade plywood boat part 1 - lumber... Part 2 - • HomeMade plywood boat part 2 - twisti... Part 3 - • HomeMade plywood boat part 3 - finish... Part 4 - • HomeMade plywood boat part 4 - Strake... Part 5 - • HomeMade plywood boat part 5 - EPOX... Part 6 - • HomeMade plywood boat part 6 - FLOA... Part 7 - • HomeMade plywood boat part 7 - Pain... Part 8 - • HomeMade plywood boat part 8 - finish... part 9 - • HomeMade plywood boat part 9 - closin... the complete playlist of this build - • Homemade plywood boat - lumber yard b... Paul Elkins Boat: • Plywood electric boat Brian at American Boathead: • Plywood electric mini boat episodes 5... Andrew Jones boat: • How to Build a Small Wooden Boat Not ...
Comments


![3D Car Modeling with Rhino 7 SubD Tools [4/8]](https://i.ytimg.com/vi/53VN_pBiy7U/mqdefault.jpg)


