Скачать с ютуб Building A Wheel Arch Storage Box | Ep 14 | Nissan NV200 Camper Van Build в хорошем качестве
Building A Wheel Arch Storage Box | Ep 14 | Nissan NV200 Camper Van Build
4 года назад
Скачать бесплатно и смотреть ютуб-видео без блокировок Building A Wheel Arch Storage Box | Ep 14 | Nissan NV200 Camper Van Build в качестве 4к (2к / 1080p)
У нас вы можете посмотреть бесплатно Building A Wheel Arch Storage Box | Ep 14 | Nissan NV200 Camper Van Build или скачать в максимальном доступном качестве, которое было загружено на ютуб. Для скачивания выберите вариант из формы ниже:
Загрузить музыку / рингтон Building A Wheel Arch Storage Box | Ep 14 | Nissan NV200 Camper Van Build в формате MP3:
Если кнопки скачивания не
загрузились
НАЖМИТЕ ЗДЕСЬ или обновите страницу
Если возникают проблемы со скачиванием, пожалуйста напишите в поддержку по адресу внизу
страницы.
Спасибо за использование сервиса savevideohd.ru
Building A Wheel Arch Storage Box | Ep 14 | Nissan NV200 Camper Van Build
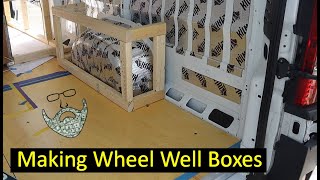
In this video I'll be building a wheel arch storage box which the bed can pull over and rest on. This is the first of a 2-part 'side console' build, so in a later video I'll be building an upper section with fold-down table which sits above the chest, leaving a gap for my bed in the middle. 🔔 Please SUBSCRIBE to my channel, thanks! 🔔 🔥 Entire van conversion playlist: https://bit.ly/2ZewxLt 📸 Instagram: / yogi.the.van 🚐 Check out my van blog: https://thetinycampervan.com ☕ Support the channel: https://www.buymeacoffee.com/LensOfJames 🙏🏻 🎶 Sign-up to Uppbeat through my affiliate link here: https://uppbeat.io/?as=lensofjames Affiliate links: 👉 NOVOO portable power generator/battery pack: https://amzn.to/3Zbsdpg 👉 Kreg R3 Pocket Hole Jig System: https://amzn.to/3FKpdJC 👉 900mm piano hinge: https://amzn.to/3ncBZKy 👉 Magnetic catch: https://amzn.to/42KoDFE 👉 Gorilla wood glue: https://amzn.to/3TKex3l 👉 Metal eyes: https://amzn.to/3LLYhgi 👉 Metal turnbuckles: https://amzn.to/3LLXMCW 👉 Matt polyurethane varnish: https://amzn.to/3naVnYe 👉 Masking tape: https://amzn.to/40tpBEd 0:00 - Intro 0:39 - Storage box design 1:20 - Measuring & layout 1:50 - Building the box 8:14 - Sanding & varnishing 9:21 - The finished wheel arch storage box --- My reasons for creating a wheel arch box are that; - It creates more vital storage in a largely unused area of the van - It creates another point of support for the bed when it is fully extended - It covers up some of my questionable carpeting over the wheel arch - It doubles up as a foot rest when we’re sat in the van. Creating an upward-lifting lid on the box would mean it is accessible even if the floor of the van is full & putting a wooden base in the bottom of the box increases its rigidity, as there won’t be a back to the box. I started by making a design of the box in SketchUp. My first stage was to work out the depth of the side pieces. I wanted to fit my water bottle and, temporarily, my portable power pack, whilst continuing to allow room for my surfboard to fit down the centre of the van. I spent a lot of time measuring out the box’s area & then masking taped its shape onto the floor of the van so that I had a visual reference. I would be building the box out of lengths of pineboard, which I could source cheaply. I first measured out the side pieces, scribed out the back edge near the side door & created a cardboard template to cut out with the jigsaw, then measured out the lid, the front & the base from the other pieces of wood. I began work on the box by cutting the side & front pieces to size, using a mixture of the table and circular saw. I needed to get all 3 pieces to the same height so the lid would sit flat. I used pocket holes to attach the cut pieces together, which really is a quick and easy way to build furniture. Next I began work on the lid. I cut it to size on the table saw & then cut the lid in 2, as per my original SketchUp design. This design allowed me to fit a hinge, as I didn’t have a back to the box. Once both lid pieces were cut to width, I cut out some material from the underside of the narrower piece using a planer & sander so that it would sit nicely over the wheel arch. I could then cut out the back so it would sit flush with the wall of the van. I attached the narrow lid piece with pocket holes & checked the fit, which was flush with the van. The final piece to cut was the base. I measured & scribed where the wheel arch needed to fit and cut the wood to size on the table saw & jigsaw, then attached it from the underside using pocket holes. I then placed it in the van & was really pleased with the fit. I did some preliminary sanding to the box before I attached the hinge & the front section of the lid, as there would be some areas that would become difficult to sand once these were attached. I used a 900 millimetre piano hinge which looks really smart on the box. I then disassembled the box and glued the joints to help strengthen them. I did a final sand on the box & could then varnish it with a matt polyurethane varnish. I thinned the first coat with white spirit, as per the instructions on the tin, sanded between each coat & applied 3 costs of varnish in total. I could now install the box in the van & I used turnbuckles to keep it easily-removable. This method has worked perfectly; the box is very securely attached & hasn’t required any drilling into the van walls or the wheel arch. I added 2 strong magnets to the lid and it from rattling whilst driving and a soft-close attachment so that the lid won’t slam. 🔔 Thanks for watching and if you’ve enjoyed this video, please LIKE and SUBSCRIBE! 🔔 #Vanlife #NissanNV200 #LensOfJames DISCLAIMER: In this video, I am in no way stating that this is the proper way to undertake the conversion of a van, however after research and experience using the van, I believe this to be the way that is best suited to my van and the way I intend to use it.
Comments