Скачать с ютуб Use the new "Arrange" feature to nest components in Fusion 360 в хорошем качестве
Use the new "Arrange" feature to nest components in Fusion 360
3 года назад
Скачать бесплатно и смотреть ютуб-видео без блокировок Use the new "Arrange" feature to nest components in Fusion 360 в качестве 4к (2к / 1080p)
У нас вы можете посмотреть бесплатно Use the new "Arrange" feature to nest components in Fusion 360 или скачать в максимальном доступном качестве, которое было загружено на ютуб. Для скачивания выберите вариант из формы ниже:
Загрузить музыку / рингтон Use the new "Arrange" feature to nest components in Fusion 360 в формате MP3:
Если кнопки скачивания не
загрузились
НАЖМИТЕ ЗДЕСЬ или обновите страницу
Если возникают проблемы со скачиванием, пожалуйста напишите в поддержку по адресу внизу
страницы.
Спасибо за использование сервиса savevideohd.ru
Use the new "Arrange" feature to nest components in Fusion 360
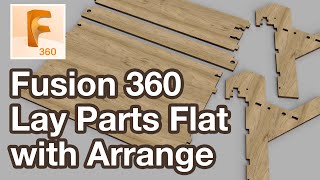
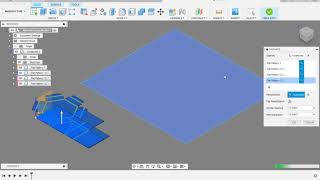
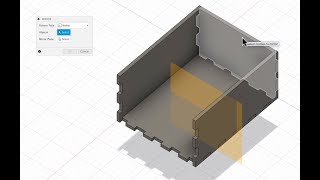
This is a 3 minute video on how to use the new "Arrange" feature in to nest all of your components for cutting in Fusion 360. 1) Arrange only works on components. 2) Move over into the "Manufacture" workspace. 3) Right-click on the menu tree and select "Create New Manufacturing Model" 4) Right click on the new manufacturing model you just create and select "Edit Manufacturing Model" 5) Select "Arrange" from the "Modify" menu 6) Select the Plane/Sketch you want to work in. I always select the bottom one. 7) Enter the dimension of the stock you are cutting from 8) Enter the border dimensions around the cuts. 9) End the spacing you want between your parts. 10) At this point, select all of the components you want to place into the defined cutting area. I have 33 in this example. 11) Select "OK" to finish with the "Arrange" function. 12) Select "Finish Edit". 13) Right-click on your new manufacturing model and select "Create Setup From Manufacturing Model" 14) At this point you proceed with your normal setup workflow. Note: Any changes you make back in the "Design" space will be reflected in this new Manufacturing Model!
Comments