Скачать с ютуб Installing Guard Rail Posts Using Simpson Deck Tension Ties в хорошем качестве
Installing Guard Rail Posts Using Simpson Deck Tension Ties
3 месяца назад
Скачать бесплатно и смотреть ютуб-видео без блокировок Installing Guard Rail Posts Using Simpson Deck Tension Ties в качестве 4к (2к / 1080p)
У нас вы можете посмотреть бесплатно Installing Guard Rail Posts Using Simpson Deck Tension Ties или скачать в максимальном доступном качестве, которое было загружено на ютуб. Для скачивания выберите вариант из формы ниже:
Загрузить музыку / рингтон Installing Guard Rail Posts Using Simpson Deck Tension Ties в формате MP3:
Если кнопки скачивания не
загрузились
НАЖМИТЕ ЗДЕСЬ или обновите страницу
Если возникают проблемы со скачиванием, пожалуйста напишите в поддержку по адресу внизу
страницы.
Спасибо за использование сервиса savevideohd.ru
Installing Guard Rail Posts Using Simpson Deck Tension Ties
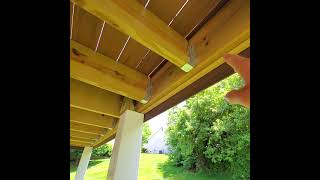
I’ve been super busy so I called up one of my friends that’s a builder and asked him is there any way that you and your guys could come and install the railing here at the warehouse. Today they showed up in force and got a ton done. They attached a temporary block to the side of the posts- this held them at the exact height we needed to bolt them onto the side of the mezzanine. We used these 6” truss screws to hold the posts plumb and keep them from moving while we drilled the ½’ holes for the bolts. The plans called for (2) ½” bolts- one 2” from the top and one 2” from the bottom of the rim joist. The top bolt gets a guard rail tensioner. The guys used this 12” long spade bit to drill the ½” holes; next, they tapped in the bolts with a hammer. The bottom bolt just gets a washer and nut; then gets tightened down. The upper bolt attaches to the guard rail tensioner. This tensioner kit comes with wood screws to attach it to the joists perpendicular to the rim joist. This tensioner ties the post, the rim joist, and the floor joists all together so there’s no movement. Let me know in the comments how many trips you think I made to the hardware store for different length bolts? @hausplans #build #howto #carpentry #construction #guardrail #simpson #tensionties #diy #contractor #tools
Comments