Скачать с ютуб iPhone X Screen Repair Guide - Fixez.com в хорошем качестве
iPhone X Screen Repair Guide - Fixez.com
6 лет назад
Скачать бесплатно и смотреть ютуб-видео без блокировок iPhone X Screen Repair Guide - Fixez.com в качестве 4к (2к / 1080p)
У нас вы можете посмотреть бесплатно iPhone X Screen Repair Guide - Fixez.com или скачать в максимальном доступном качестве, которое было загружено на ютуб. Для скачивания выберите вариант из формы ниже:
Загрузить музыку / рингтон iPhone X Screen Repair Guide - Fixez.com в формате MP3:
Если кнопки скачивания не
загрузились
НАЖМИТЕ ЗДЕСЬ или обновите страницу
Если возникают проблемы со скачиванием, пожалуйста напишите в поддержку по адресу внизу
страницы.
Спасибо за использование сервиса savevideohd.ru
iPhone X Screen Repair Guide - Fixez.com
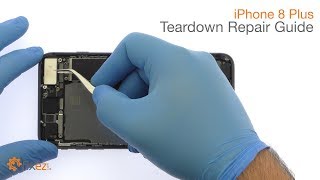
High-Quality iPhone X Display Assembly: http://bit.ly/2BfLKtB iPhone X Repair Parts: http://bit.ly/2zC3dfP iPhone X DIY Repair Tools: http://bit.ly/2lzLIop Watch the Official iPhone X Screen Repair Guide. Following the step-by-step iPhone X screen assembly replacement instructions we have provided will help you safely fix a cracked or damaged 5.8-inch (diagonal) all-screen OLED Multi-Touch display. Visit Fixez.com for all of the DIY iPhone X replacement screens, parts and tools you need to fix your phone quickly, and affordably. If you need your iPhone X repaired ASAP instead- we have you covered there too. Contact one of our skilled technicians at 866-233-6460 or [email protected] and they will fix your device for you. They are available Monday - Friday, 9am to 5pm PST. Subscribe to our YouTube Channel for additional DIY smartphone and tablet teardown and repair videos! / @fixez Like us on Facebook: / fixez.com Follow us on Twitter: / fixezdotcom iPhone X Screen Repair Video Steps: Step 1 • Power down your Apple iPhone X smartphone. Step 2 • Eject the Nano-SIM Card Tray. Step 3 (iPhone X Display Assembly) • Remove the bottom 3.4mm Pentalobe screws located next to the lightning connector. • Apply some heat and then use the precision knife to create enough space to insert a triangle opening tool. • With the opening tool slice through the adhesive and carefully decouple the iPhone X display assembly from the rear case. Now the standard, it opens to the side. • The display assembly is still connected to the iPhone by cables, so don’t try to remove it entirely just yet. • Remove the following 5 Tri-Point screws securing the bracket that covers every logic board connector. These screws are different sizes, so be sure to remember where they go. • With the unibracket out of the way pry the battery and display cables up from the logic board and free the 5.8” all-screen OLED Super Retina HD Display from the phone. Step 4 (iPhone X Upper Display Component Assembly) • Remove the following 3 Tri-Point screws. • Use the spudger to help extricate the upper display component assembly. It includes the loudspeaker, microphone, ambient light sensor, flood illuminator, and proximity sensor. To reassemble your device, follow the steps in reverse order.
Comments


![iPhone X – Screen replacement [repair guide including reassembly]](https://i.ytimg.com/vi/CpteNe9DUrw/mqdefault.jpg)