Скачать с ютуб Perfectly Thickened Apple Pie Filling Canning Guide - Ready-to-Use Rebel Apple Recipe в хорошем качестве
Perfectly Thickened Apple Pie Filling Canning Guide - Ready-to-Use Rebel Apple Recipe
7 месяцев назад
Скачать бесплатно и смотреть ютуб-видео без блокировок Perfectly Thickened Apple Pie Filling Canning Guide - Ready-to-Use Rebel Apple Recipe в качестве 4к (2к / 1080p)
У нас вы можете посмотреть бесплатно Perfectly Thickened Apple Pie Filling Canning Guide - Ready-to-Use Rebel Apple Recipe или скачать в максимальном доступном качестве, которое было загружено на ютуб. Для скачивания выберите вариант из формы ниже:
Загрузить музыку / рингтон Perfectly Thickened Apple Pie Filling Canning Guide - Ready-to-Use Rebel Apple Recipe в формате MP3:
Если кнопки скачивания не
загрузились
НАЖМИТЕ ЗДЕСЬ или обновите страницу
Если возникают проблемы со скачиванием, пожалуйста напишите в поддержку по адресу внизу
страницы.
Спасибо за использование сервиса savevideohd.ru
Perfectly Thickened Apple Pie Filling Canning Guide - Ready-to-Use Rebel Apple Recipe
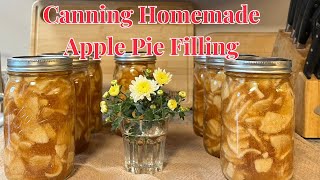
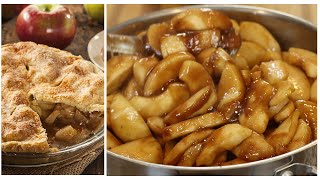
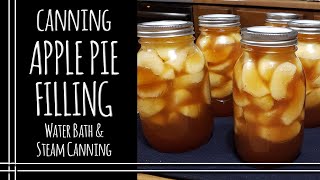
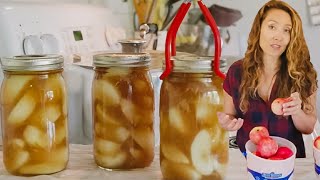
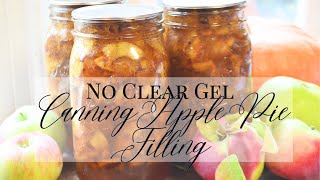
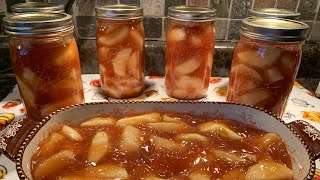
Dive into the art of canning with my latest tutorial on creating a perfectly thickened apple pie filling. In this video, I share my special recipe using a thickener that ensures your filling is just the right consistency every time. Not only is this filling deliciously rich and flavorful, but it's also ready to use straight out of the jar - perfect for quick desserts or a homemade treat. Throughout the tutorial, I cover: -My chosen thickener and its role in achieving the ideal filling texture. -Precise time and temperature details for canning, essential for both safety and quality. -The full process of preparing, cooking, and canning the apple pie filling. You'll see how easy and rewarding it is to preserve the taste of autumn in a jar. And if you're as passionate about preserving and cooking as I am, don't forget to subscribe to my channel. By subscribing, you'll stay updated with more content like this, helping you master the art of home canning and cooking. 🍏 #PerfectApplePieFilling #HomeCanningMadeEasy #ReadyToUse #SeasonalCanning #FromOrchardToTable 👉 Hit the subscribe button below to join our community and explore more canning recipes and kitchen tips! Ingredients - 12 cups apples, peeled and sliced - 3 cups water - 1 1/2 cups sugar - 1 1/2 tablespoons cinnamon* - 1/4 teaspoon nutmeg* - 1 teaspoon vanilla extract - 1 tablespoon lemon juice - 1/2 cup cook-type clear gel (modified cornstarch used for canning-link below to order if needed) * I adjusted these ingredients slightly from the video Equipment - Large pot - Canning jars, lids, and bands - Canning funnel - Ladle - Water bath canner - Jar lifter - Bubble popper or a non-metallic spatula - Clean cloth or paper towels NOTE: I am using a thickener in this recipe, and doing so is not USDA-tested and approved. Please watch the video until the end to see my data so you understand why I am comfortable with this for my family. This content is provided for informational and entertainment purposes. Always follow safe canning practices to ensure your food is well-preserved and safe to consume. Instructions Preparing the Apples 1. Wash, Peel, and Slice Apples: Start by thoroughly washing the apples. Peel and slice them into even pieces, and place them in water with a bit of lemon juice to prevent browning. Making the Filling 2. Combine Ingredients (Except Apples and water). In a large pot, mix together the sugar, cinnamon, nutmeg, vanilla extract, lemon juice, and clear gel. Add the water last and slowly while stirring to ensure the clear gel is fully dissolved and there are no lumps once the water is added. 3. Cook the Mixture: Place the pot on the stove over medium heat. Bring the mixture to a boil, stirring constantly to prevent sticking and burning. 4. Add Apples: Once the mixture is boiling, add the sliced apples. Stir well to coat all the apple slices with the mixture. 5. Simmer the Apples: Bring the mixture back to a boil, then reduce the heat and let it simmer for three to five minutes. The apples should be tender but not mushy. Canning the Filling 6. Sterilize Lids: Start with clean canning jars, lids, and bands by boiling them in water for at least 10 minutes if required. (Some lids no longer require this step, so check your package.) 7. Fill the Jars: Use a canning funnel and ladle to fill the jars with the hot apple pie filling. Leave about 1 inch of headspace at the top of each jar. 8. Remove Air Bubbles: Slide a bubble popper or a non-metallic spatula around the inside edge of the jar to remove any air bubbles. 9. Wipe Rims and Seal: Wipe the rims of the jars with a clean cloth or paper towel. Place the lids on the jars and screw on the bands until they are fingertip tight. 10. Process in Water Bath: Place the jars in a water bath canner, ensuring they are completely submerged. Bring the water to a boil and process the jars for 25 minutes (the time is the same for pints or quarts). 11. Cool and Store: After processing, remove the jars using a jar lifter and place them on a towel or cooling rack. Do not disturb the jars for 12-24 hours. Check the seals, label, and store the jars in a cool, dark place. Tips - Apple Selection: Use a mix of tart and sweet apples for a balanced flavor. - Clear Gel: Make sure to use cook-type clear gel, as it is specifically designed for canning and tolerates high heat. - Headspace: Leaving the proper headspace is crucial for a good seal and to allow for expansion during processing, especially since this recipe is using a thickener. Canning Safety Always follow canning guidelines to ensure food safety. If a jar doesn't seal properly, refrigerate it and use the contents within a few days. Clear Jel: https://amzn.to/3S32Cgq Apple peeler: https://amzn.to/3RXQgpV As an Amazon Associate, I earn from qualifying purchases, at no additional cost to you. Happy canning! #DailyKitchenNuggets #DryItCanIt #canning #canningapples #applefilling #rebelrecipe
Comments